Posts

Showing posts with the label painting

Coffee Table Redo-Part3

Image
Our coffee table serves many purposes. It's the place where the kids do homework, make crafts, sometimes eat their dinners. It's also a foot rest, and occasionally used in pillow/blanket forts. It's used A LOT, and had been showing lots of wear here lately. This coffee table has gone through a couple of transformations. To see the actual before, you can go here . I had not been planning on re-doing the coffee table. It sort of just struck me last Friday that I needed to strip all of the nasty paint off of it.  This was part two...the center is chalkboard paint. I had found some inspiration on Mrs. Mustard Seed's blog with some chalkboard tables she had created. At the time of the second re-do, my children had a nasty habit of writing on furniture. I came up with what I thought was an ingenious idea to paint chalkboard paint on the top of the coffee table; that way they could have at least one piece of furniture in the house to write on with out mommy fussing. Well, it...

Bicycle Art

Image
It seems like ages ago I told you that I would have a fun little art project for S.R.'s room . Well, I finally got around to making one. I just needed the right inspiration! I wanted to do something with a bike, but just wasn't sure what. I came across this really cute vinyl cruiser on Etsy  , and knew it was exactly what I needed. Source And this is what I came up with. FrogTape makes a chevron painter's tape. Crazy! I know!  It's super easy to use!  I found some at Lowes the other day, but you can also purchase it from Amazon.  Click the link below and it will take you directly to Amazon.                                 The tape isn't recommended for use on textured surfaces...says so right on the box. As you can see below, my canvas is a textured surface. I went with it anyway because sometimes you can bend the rules a bit in the crafting world.  I used a scrap piece of tape to k...

Painting a Pillow

Image
Is anyone else being hammered by hot temperatures right now? Even though it's blazing hot here in the South, it hasn't deterred me from working away on Fall decor. I'm so glad you are back here today with me. I have a little tutorial on how to spruce up a plain burlap pillow using stencils and fabric paint.  I found this image on  Pinterest .  I fell in love with the pillow and thought "how fun would that be on my  new bench ".  If anyone knows the source of this photo, please let me know so I can give them credit. Thanks!! So I gathered all the supplies I needed.  A pillow form(purchased), burlap(purchased), stencils, black fabric paint, and paint brush.   I made the pillow cover, and added a zipper. I am really into adding zippers to pillows because it makes it easier to clean the covers. If you are able to do it, I would highly recommend it!! After the pillow cover was made, I taped some paper to the width of the cover and traced the letters on...

Old Bench Makeover

Image
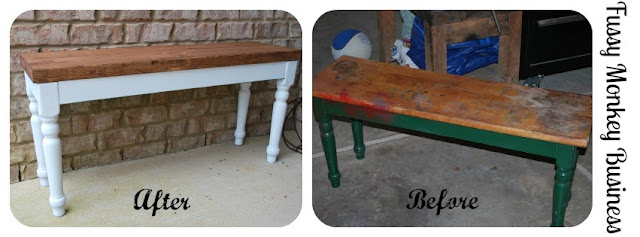
I started playing around with  picmonkey.com  today...yep, I know I am behind the times.  I'm going to have lots of fun with this new-to-me site! Notice the B & A collage picture...well it's more like A & B because I'm new to this collage making business. I'll get the hang of it...eventually. Anywhoodles, today I am sharing a little bench makeover.  This little guy was a yard sale find. It belonged to a little old man, and he used it as his work bench. As you can tell from the top, it got lots and lots of use. He passed away, and his wife had no use for it, so she sold it to me for $1.  I'm really digging the painted furniture with the wooden tops, so this bench seemed like the perfect piece to try out that technique. The top & sides of the bench seat had a thin veneer surrounding MDF. The seat had to go because, well, just look at it. It has seen better days. The 90's ivy green paint was definitely an eye sore as well.  But there were good bone...

Basketball Picture Frame

Image
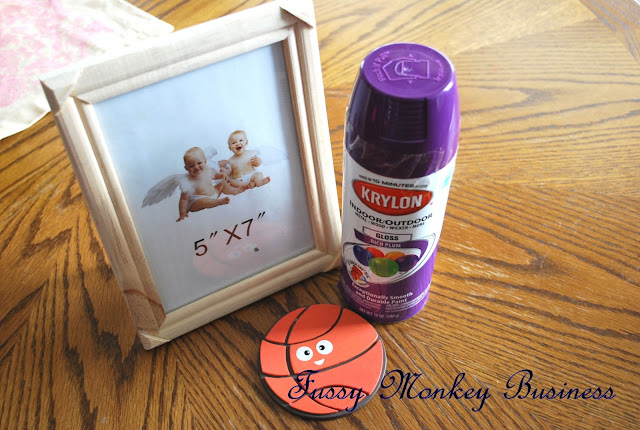
This year the hubs and I coached E's Upward Basketball team. It was filled with lots of surprises, and it was a lot of hard work, but all 5 boys seemed to have a great time playing. We had the awards night this week, and I wanted to give them something special. I'm not a fan of trophies, and at this age, the trophies usually are broken to bits within the first few days of receiving them. After our very last game, I got a candid shot of the boys.  I decided that I would make picture frames for the boys as their gift. I found all of the items at Hobby Lobby. -Picture Frame -Purple Spray Paint -Wooden Basketball Cut-out -Hot Glue Gun(had on hand) I laid the frames(minus the glass and backing) on a cardboard box outside where there was plenty of ventilation.   I sprayed 3 coats of purple Krylon paint on the frames..waiting 10 minutes between each coat. Once they were dry, I glued the little basketball guy to the corner of the frame making sure not to let it hang too low across the...

Patina Monogram Tutorial-Sisterbug Monograms Product

Image
My friend Kera, from  Sisterbug Monograms  asked me a few weeks ago if I would be willing to get creative with some wooden monograms. I always jump at the chance to get my craft on, so of course I said YES ! So then, I had to come up with the perfect finish....what's a girl to do?  A couple of years ago, before Pinterest( WHAT ? T here was a time before Pinterest? ), I ran across this really awesome tutorial at  Brassy Apple  on how to do an aged paint technique. I knew that this would be the perfect paint treatment for my gi-normous "Dub-Yuh."   Today, I am showing you the step-by-step process that I went through.  The monograms come in a natural finish..or to us country folk, "not done up".;o)  So because they are un-finished, you need supplies to make it even more awesome. For your supply list, you will need: -Acrylic paints, I used 4 in all -Sponge Paint Brushes -Dove Bar Soap -Sand Paper -Blow Dryer(to make the paint dry quicker) & -Pap...