Posts

Showing posts with the label tutorial

Burlap Wreath Tutorial

Image
I.am.ready.for.fall. Since Fall is around the corner, and I have a few spare moments with the kiddos back in school, I have been able to catch up on some decor projects I have been wanting to tackle. One of them being a burlap wreath.  You can't have Fall without a burlap wreath. It's in the rule books somewhere...I'm sure of it.  There are so many different styles. Raggedy, bubbly, smooth, etc. I went for more of a shabby look...sounds better than raggedy, right? Today I'm sharing how quick and easy this project is.   Your list of supplies: 3 yards of burlap(I used two colors)(Burlap is $3.99 at my Hobby Lobby. I used a 40% off Q) Wire hanger( Joan Crawford would die) Needle Nose pliers Scissors Tape Measure Start off by cutting your strips. I cut mine at 5" wide. Then you will want to straighten out the wire hanger.  Once all of the burlap is cut, do a fan fold. When finished, you will roughly have a 5x5 square. Thread the wire hanger through the square.  ...
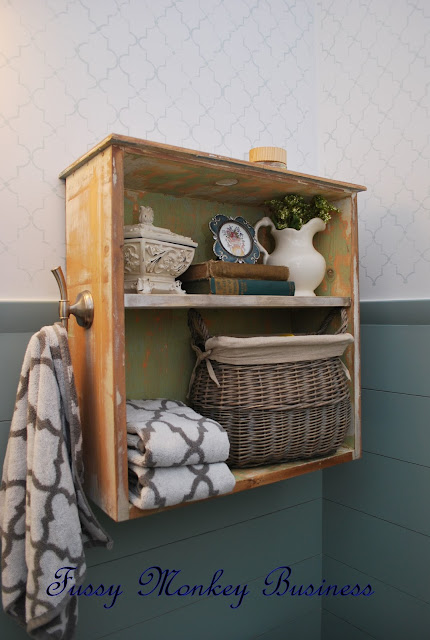
Drawer-Turned-Bathroom Shelf

Image
School is back in session here, so I actually have time to sit down and do some posts. I realized today that there are several projects that I talked about on Facebook, but never posted about them, so I 'm going to have to get with it:o) Speaking of Facebook, the  LEGO Table  has been unbelievably popular. Y'all have been blowin' up my feed! It's already more popular than my  Menu Board ...cuh-razy! So today is all about this cute little shelf that's hanging in our newly remodeled half bath . This is where I started. I found this drawer, along with another on the side of the road when I was on my way to drop S.R. off for preschool last year. The hubs wasn't happy about it, so to the attic it went and sat for over a year.  I've seen a lot of drawer-to-shelf makeovers here lately but I really didn't know where I would put one until I was in need of a shelf for the bathroom. Awesome!  I was not about to sand this piece down because I didn't know what ki...

Dr. Seuss' Thing 1 & Thing 2 Shirts

Image
We are headed to Florida soon for a vacation, and we have decided to visit Universal Studios this year. We have been to Disney the past 2 years, and the hubs and I are kinda wanting to mix things up a bit. The kids have no idea we are going there. They think it's JUST a beach trip...:o)  If you have been following me for a while, you know that I did a whole ensemble for the kids to wear to Disney. To see those outfits, you can go  Here ,  Here ,  Here , &   Here . We are planning to go to Universal  for only 2 days, so I only need 2 outfits:o) Here is the first matching outfit: To make these super easy and super cute shirts, here is a list of supplies you will need: Red t-shirt White tee or white stretchy fabric Light Fabric Transfers(found at any craft store or Walmart) Heat Bond...I prefer the kind that you can sew on. scissors iron thread  sewing machine  Start out by washing and drying your tees. That is to ensure that your shirts don't sh...

Pottery Barn's Hadley Ruched Duvet Knock Off

Image
I hope that you all had a wonderful Mother's Day.  S.R. has a sinus infection right now, so things have been a little off kilter around here. I still haven't been able to use my chalk paint yet, but I am really looking forward to it:o)  I did get the chance to finish a project that I have been working on. A couple of weeks ago the Pottery Barn catalog came in the mail. I always get excited when those things come because they have so many beautiful things in them.  When I saw the  Hadley Ruched Duvet Cover , I wanted it....badly. Isn't it beautiful? Photo Credit: Pottery Barn I really wanted it for MY bed, but the hubs and the color white aren't on good terms, so I knew that having it in our room was a no-go:o/ The guest room needs a makeover, so I decided to put it there. I knew that this was something that I could make. Pottery Barn sells this duvet cover for $179.00. That's just the cover...if you don't have a duvet, then there is another added cost. So after ...